So Many Photos, So Little Time: Organize Wisely
Ever wonder how many photos people take each year? I sure did — and, of course, I had to Google it! According to Keypoint Intelligence, in 2020, people took more than 1.4 trillion photos. Yes, trillion with a “T”!
But that made me think… what’s happening to all those photos? If you’re like most of us, they’re scattered everywhere — on your phone, in the cloud, on Facebook, tucked into old CDs or DVDs, and maybe even printed and hiding in a shoebox at the back of your closet. Sound familiar?
It can feel totally overwhelming. When our photos are spread across devices and platforms, it’s hard to find the ones we love — and even easier to lose them altogether.
Why I Got Serious About Organizing
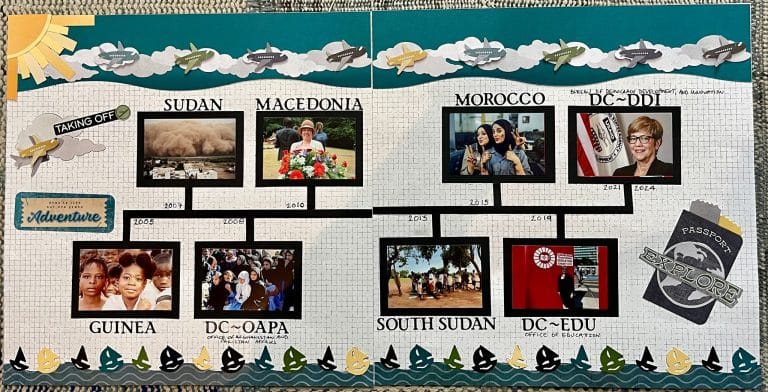
I learned this lesson the hard way. Back in 2007, my husband, Richard, and I moved from Conakry, Guinea to Khartoum, Sudan for my work. We flew with just four suitcases — everything else, including our cherished photos, was packed up in a big shipping container labeled Household Effects (or “HHE,” as the government likes to call it).


We arrived safely, but our HHE did not. For fourteen long months, our entire household — photos, keepsakes, scrapbooks, everything — was lost to humanity. (It eventually turned up in a hot, un-air-conditioned warehouse in Port Sudan, if you can believe it!)
When we were finally reunited with our things, I made a vow: never again would I risk losing those irreplaceable memories. I decided to scan, organize, and back up all my photos — printed and digital.
It wasn’t quick, but it was absolutely worth it.
My Step-By-Step Process for Organizing Digital Photos
I’m focusing on digital photos in this post — I’ll tackle printed photos in a future one (because let’s be real, that’s another project in itself!).
Step 1: Culling the Clutter
These days, I mostly take photos on my iPhone, which makes uploading to my cloud service a breeze — but it also means I can rack up hundreds of shots in a single weekend.

To keep things under control, I regularly delete the extras. Having fewer photos actually helps me find my favorites faster — and it saves storage space, too!
Here’s what I typically delete:
- Duplicates or blurry photos
- Screenshots I only needed for a quick reminder
- Endless “almost the same” shots of sunsets or flowers (you know the ones!)
- Photos that I’ve already posted on social media and won’t use for scrapbooking or another purpose (hello again, endless shots of sunsets and flowers!)
Scrapbooker’s tip: When I’m deleting duplicates, I often keep both portrait and landscape versions of the same image, or a close-up and a wide shot. That gives me options when I’m designing scrapbook page layouts later.
I usually do my culling and quick edits during little pockets of downtime — waiting for an appointment, riding as a passenger in the car, or relaxing with a cup of coffee (or glass of wine!).

Step 2: Uploading and Organizing
Once a month, I upload my photos to my cloud storage. Before I do, I finish any editing or deleting that didn’t get done earlier.
Then I create a new folder named for the month and year — for example 2025-11. It keeps things neat and searchable. It’s also very clear where each photo goes. If I try to organize by theme, it can get confusing as any one photo can belong to multiple themes (people in the photos, location of photo, event type etc.)

When everything’s uploaded, I tag photos by people and places first — then add extra tags for things like holidays, vacations, pets, or special events. So if I want to find Sam’s Graduation or Scotland 2025, I can pull them up instantly. Now, I can search by date, people, locations, events, or whatever tags I used!
My cloud service has facial recognition, which automatically tags the people for me — such a time saver!
Step 3: Backing It All Up
Even if your photos live in the cloud, it’s smart to have a backup. Cloud services can fail, companies can shut down, and sometimes… human error happens (hello, accidental deletion).
My cloud syncs with my laptop, so I have a second copy of everything at home. You can also back up to an external drive for extra peace of mind.
And, of course, for any photos I plan to scrapbook, I print them out and store them in photo-safe boxes. I love the Creative Memories Power Sort Box for 4x6s and 5x7s, and the Power Layout Kit for larger photos or works-in-progress. Physical copies of your photos add one extra backup — one extra layer of security.

A Little Perspective
Organizing photos isn’t about perfection — it’s about preservation. It’s about honoring the stories behind those snapshots and making sure they’re there for you and your family (and your future scrapbook pages!) when you need them.
I started with just one hour every Saturday morning — scanning, sorting, and backing up little by little. You’d be amazed how much progress you can make that way.
And once it’s done? Oh, the joy of scrolling through a beautifully organized photo library… ready for your next album, project, or walk down memory lane.