Fast2Fab Portugal Travel Album
While home and unable to travel due to COVID-19, I’ve been reliving my trips by paging through travel albums. I’d like to invite you to take a virtual trip with me to Lisbon. Watch as I flip through my Portugal scrapbook, while giving tips on creating your own travel albums. You can find many of the scrapbooking tips and links to Creative Memories products below. Bon Voyage!
TRAVEL WITH ME TO LISBON
TOO MANY PHOTOS, TOO LITTLE TIME
Most of us take hundreds if not thousands of photos when we travel. It can be hard to find time to turn those photos into a beautiful scrapbook that you’ll enjoy looking at time and time again. But fear not. That’s what the Creative Memories Fast2Fab albums are for. These amazing albums save you both time and money! It’s a timesaver because the pages are pre-designed and printed. Simply adhere your photos for instant, beautiful pages. It’s a money saver because with pre-designed pages, you don’t need to purchase a lot of designer paper. And the Fast2Fab albums pages cost the same as Creative Memories regular white scrapbook pages. No matter what type of Creative Memories pages you choose, rest assured, they are photo safe!
Fast2Fab albums and pages come in a variety of themes and matching collections, with coordinated album covers, pages, stickers and embellishments. The current Passport to Adventure Fast2Fab album is perfect for trips.


KEEP IT SIMPLE OR ADD A LITTLE FLAIR WITH STICKERS & EMBELLISHMENTS
Are you short on time and just want to get your photos into an album as quickly as possible? Or would you like to add a little extra flair? With the Fast2Fab albums, you can do either or both. In the page below, I kept it simple. I used my photo-safe Creative Memories repositionable tape runner to add two photos and one embellishment to complete this page in less than two minutes.

Sometimes, I dress up my Fast2Fab pages with coordinated stickers, embellishments and borders. This allows me to be creative and add a bit of my own flair without taking a lot of time. I love to shop Creative Memories by themes, or coordinated collections. You can buy collections in a bundle or purchase items individually.

Design Tips: Notice how I cut the bike embellishment in half. I taped one half to the left page and then lined up the other half to add to the right page. This helps your two pages flow together as one cohesive layout. I used the Creative Memories Border Maker System and black letter stickers to make the Street Scenes border along the left hand side. (The Film Strip Border Maker Cartridge is no longer available, but there are plenty of cartridges to choose from.)
MAKE SURE TO TELL THE STORIES BEHIND THE PHOTOS
Journaling helps to make your album unique. I use a variety of techniques. I like to cut and paste Facebook posts to include in my albums. Sometimes, I cut information out of a travel book or journal to include details about the places we visit. I always include journaling in my own handwriting. It not only personalizes your album, but will create a treasure for generations to come. Sometimes, I just journal a line or two, and other times, I create an entire page. I just follow my heart when it comes to telling the stories behind my photos. If you do add journaling or writing, make sure to use photo-safe journaling supplies. The page below includes both text from a travel guide as well as a quick bit of my journaling.

And below, you’ll see an example of a page featuring a post from my Facebook feed. What an easy page — I did a screen shot of my FB post and printed it out on 4 x 6 photo paper and added a few embellishments to the Fast2Fab page.

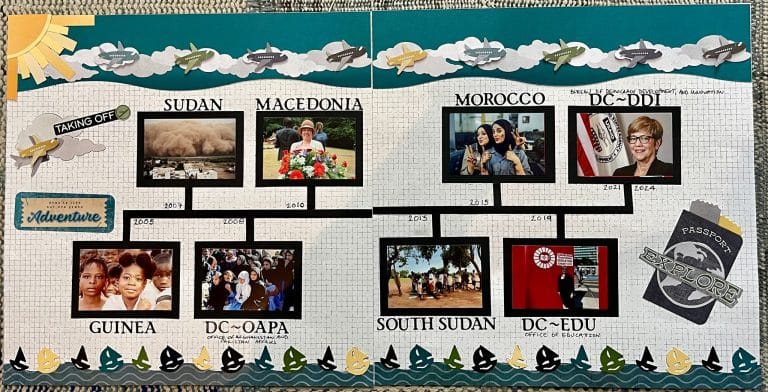
USE DIFFERENT SIZE PHOTOS TO ADD INTEREST TO YOUR LAYOUTS
For some albums, I only use 4×6 photos. This is especially true when I have tons of photos to print. I will use an on-line service to expedite the printing. For other albums, though, I like to print my photos in a variety of sizes. For really special or beautiful photos, like the one below, I may choose to print a full page photo, using 8.5″ by 11″ photo paper.

Sometimes, I will crop my 4×6 photos down to smaller sizes using my photo trimmer, allowing me to highlight photo details. Other times, I use my home printer to print smaller-sized photos. I often use the smaller photos to create borders or as design elements. On the below page, I printed small photos to create the bottom border and then used my corner rounder to soften the edges. The corner rounder is an easy and quick way to add visual interest to your pages.

DON’T FORGET THE MEMORABILIA
Are you like me? Do you return from a trip with your suitcase stuffed full of coins, postcards, maps, menus, name cards, hotel receipts, and other memorabilia? I love including these items in my scrapbook as another way to personalize my albums and remember my trips. Here are suggestions for items that you may wish to include in your travel scrapbook:
- Maps, menus, and brochures — if these items don’t fit on your page, you can always tuck them in a 12×12 top loading pocket page or an 8.5×11 pocket page. All Creative Memories albums are customizable. The album covers and pages are sold separately, allowing you to mix and match page types.
- Post cards — If you did not capture the perfect photo, post cards are a great way to include a beautiful shot in your album.
- Ticket stubs — You can include ticket stubs from planes, trains, metros, museum or monument entrances. They make great embellishments for your photos.
- Scans of sketches or other artwork — either your own or something you purchased.
- Receipts from restaurants and stores — I was an exchange student in France in the early 1980s. My French scrapbook includes the price tag for the first pair of French blue jeans I bought at La Galerie Lafayette. It’s so fun to see how much blue jeans cost in 1981 and to remember how excited I was to buy a pair of chic French jeans!
The possibilities are endless.